CTPV PLUGIN GUIDE
In this guide we will learn how to use the WooCommerce plugin that allows you to make payments with the Vottun POS. To do this, we must have some previous considerations and follow the steps indicated for installation and commissioning.
Preliminary considerations
Before starting with the installation we must take into account a series of data that must be passed to Vottun for the correct operation of the plugin.
1. First of all, note that Vottun POS will take care of changing the status of an order when the transaction is completed. That's why you will need both the WooCommerce API keys and the WordPress home page URL.
a. To get the URL of the page just copy in the browser the URL of the domain .com, .es or whatever. For example: if the url is https://mipagina.com/tienda you will have to copy https://mipagina.com and not include the part associated with /store.
b. To get the WooCommerce API keys you have to follow a series of steps:
i. Access the WooCommerce settings menu in the sidebar of the WordPress administration page.

ii. Once in the settings, access the Advanced option in the top menu.

iii. After accessing Advanced, a submenu is displayed below the top menu, in which we must access the API REST option.

iv. Once here, click on the Add key button, so that the process of generating a new key will begin.

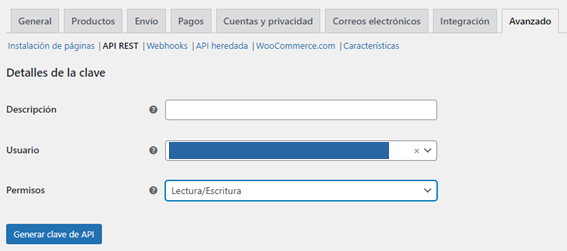
v. First it will ask us for a description of the use of the key, in which we can indicate that it is a key for the Vottun POS, so that it is descriptive and we have no doubts about its use. In addition, we will be asked to enter the WordPress user that will be associated with this key, which should be an administrator user, as well as the permissions it will have, which must be read and write. When we have completed all the data we will click on the generate API key button.

vi. After having finished the creation of the keys, the result will be something like what is shown in the image below, where we are shown the client key, the client secret key and a QR code that we can scan to read the data. These two keys must be passed to Vottun in order to manage the request and generate an api_key and a token.

2. Secondly, once the client keys have been provided to Vottun, an api_key and token will be sent and used later in the configuration.
Plugin Installation
We will now begin by looking at the steps we will have to follow to start using the plugin.
1. We will start installing the plugin from the ZIP file that has been provided to us. To do this, go to the WordPress Plugin section and click on Add new.

2. Once in Add new, we click on the Upload plugin button at the top and we will see a dialog box where we can select the ZIP file, and then click on the install now button and install our plugin.


3. If everything has worked correctly, when the installation is finished we will be automatically asked to activate the plugin. Click the Activate Plugin button and everything will be ready to start the configuration. To start configuring the plugin, we will access the WooCommerce settings again.
4. In this occasion, in the upper menu we will access to the Payment option, where the different payment methods will be shown together with the option of our plugin.

5. To access the plugin configuration click on the Manage button, located to the right of the plugin line.

6. When we access to the configuration, we will visualize the different options that we have in the plugin. To finish the configuration and to be able to use it correctly, it will be enough to introduce in the API Key field the api_key and in the Token field the token previously received from Vottun. Save the changes and the new payment method will appear when we go to finalize a purchase.
